General
Running Shed Phase 7 (Fitting Out)
As described in the page for the structure of the whole project, the Running Shed is being built in seven phases. The first three phases were all concerned with preparation for the construction work, and phases 4 to 6 were concerned with the actual construction of the building. Phase 6 was completed just at the end of 2016, and then this last phase covers fitting out the building to make it usable.
A key step in this was to make the building secure, by constructing and fitting doors to the south end of the shed, but even while preparations were being made for this there were various bits of work that could be undertaken. One of the first of these, which was done early in January 2017, was to prepare for creating the doorway through into the old workshop, by installing a lintel to support the brickwork above it, as shown in the two pictures below.
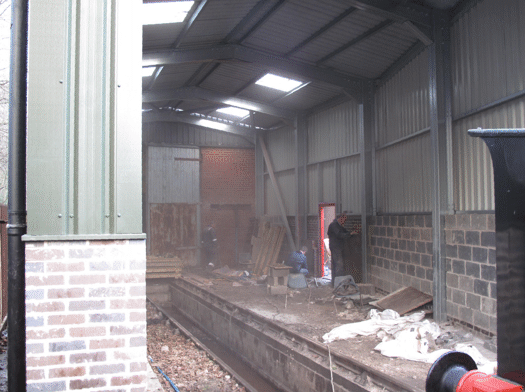
A view into the running shed, showing where a slot is being cut into the brickwork for the lintel.
Picture © Tony Cowling, 2017.
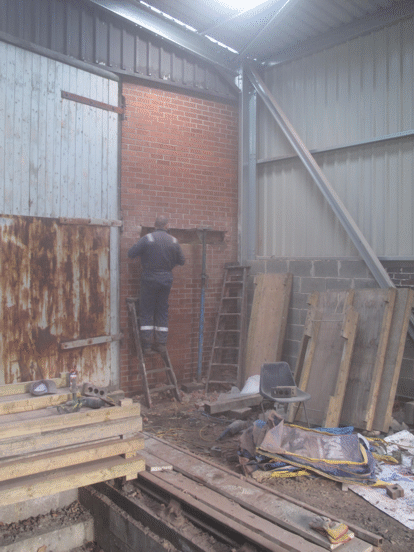
One of our volunteers cutting the slot in the brickwork for the lintel.
Picture © Tony Cowling, 2017.
Several weeks later, early in February, the lintel had been installed, as shown in the picture below. Also part of the water treatment plant had been positioned (the two blue objects alongside the east wall), but not yet plumbed in, and the electrical conduits and distribution board case had been mounted on the wall.
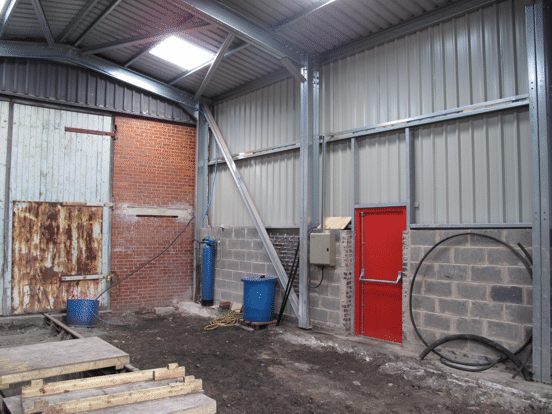
The lintel for the doorway into the old workshop in place.
Picture © Tony Cowling, 2017.
One piece of work that needed to be done to prepare for installing the doors was to construct the two parts of the doorstep that go either side of the track, and the picture below shows them being finished off.
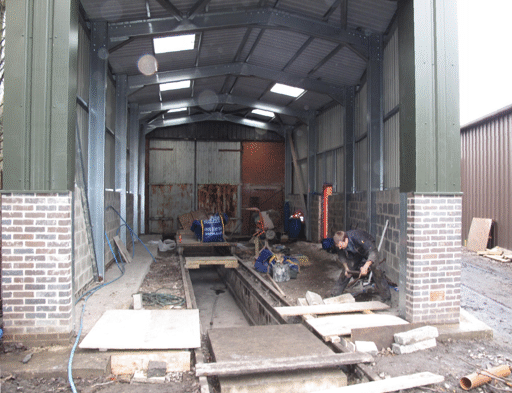
The two sections of doorstep either side of the track being finished off. They have been covered with boards to stop people treading on them until the concrete had cured.
Picture © Tony Cowling, 2017.
Also some preliminary work was being done on the floor. Originally it had been proposed that this would be ballast, but we had been given a large quantity of wooden blocks that had originally formed the floor of the machine shop at the premises of Braime Pressings Ltd, and had been recovered from this building when it had been cleared to make space for the University Technical College. It was clear that these blocks would form a much better floor, and the picture below shows some of them stacked up against the wall of the building, waiting to be cleaned.
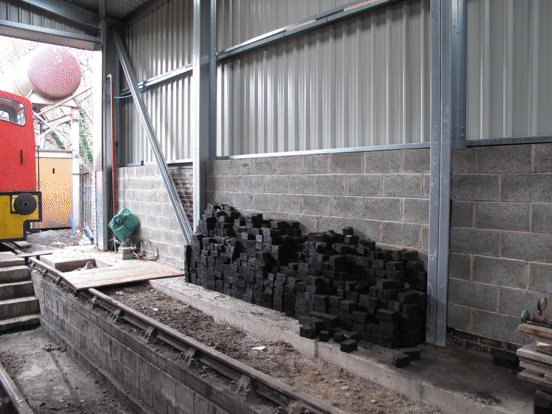
Some of the wooden blocks for the floor, stacked up against the west wall of the shed, ready for rough cleaning.
Picture © Tony Cowling, 2017.
Meanwhile, there had been some discussion about whether the main door should be a roller shutter, as originally intended, or a pair of conventional hinged doors like the others in the workshop. The conclusion of this was that fitting hinged doors would actually give additional space inside the building. The doors had therefore been designed, and in the workshop the first of them was being constructed, as shown below.
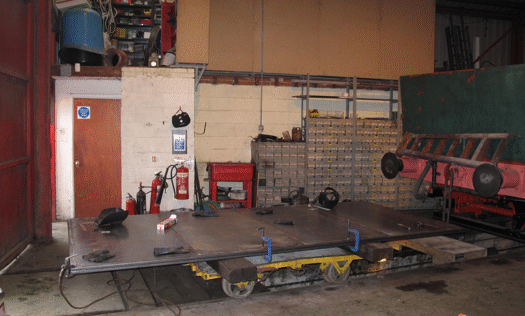
A door under construction in the workshop, mounted on a four-wheel trolley.
Picture © Tony Cowling, 2017.
Here the frame of the door had been welded up, and the picture below shows a section of sheeting being welded onto the frame.
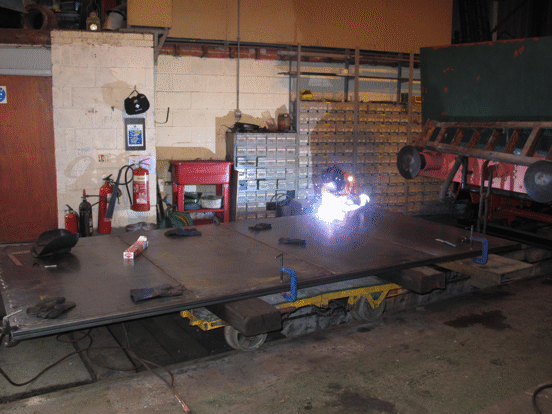
Welding in progress: the locomotive to the right is "Brookes No. 1".
Picture © Tony Cowling, 2017.
Once both doors had been made then they were fitted into place, and this was done early in March. The picture below shows the second one being lifted by the crane while the hinge fittings were attached to the frame of the building.
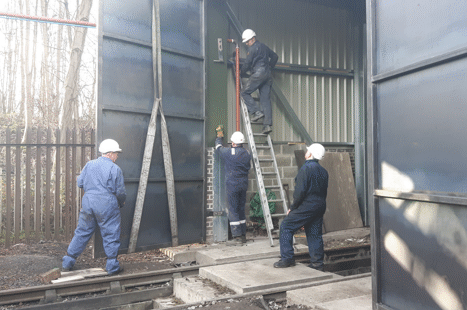
Lifting the second door into place: the hinges for the first door have already been attached to the frame of the building.
Picture © Richard Pike, 2017.
The picture below then shows the the two doors from the inside of the building. Unfortunately, it is apparent from this picture that actually they did not close properly.
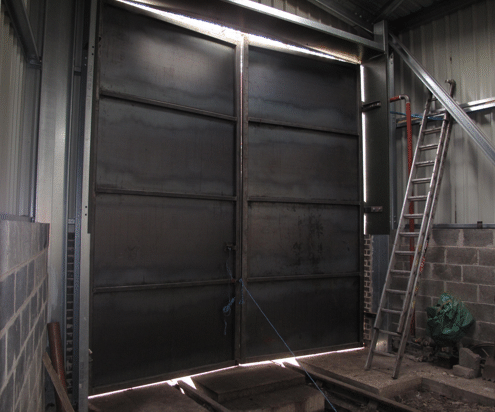
The two doors in place, fastened temporarily by a piece of rope.
Picture © Tony Cowling, 2017.
The reason for this problem with closing the doors turned out to be that the frame of the building (which had been designed on the assumption that a roller shutter door would be fitted) was actually flexing under the weight of the doors. A different method of supporting their weight was therefore needed, and so an external door frame was designed and fabricated, and by mid-March could be fitted to the end of the building. The picture below shows this frame being lifted into place.
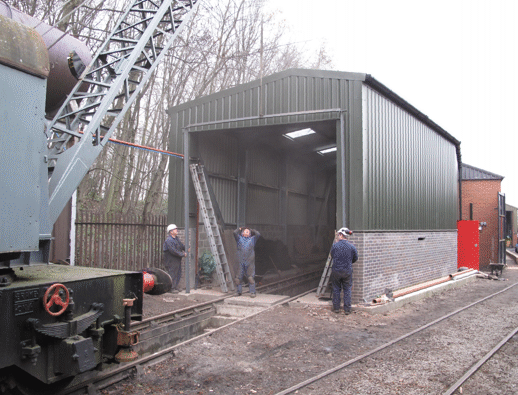
The external door frame being positioned, prior to attaching it to the building.
Picture © Tony Cowling, 2017.
Once this frame had been positioned precisely and attached firmly to the building, then the doors could be hung on it, and the picture below shows the two doors finally in place.
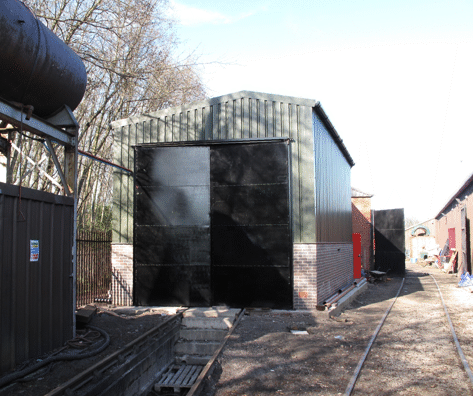
The two doors mounted on their external door frame, and closed securely.
Picture © Tony Cowling, 2017.
Meanwhile, even with the external doors as originally installed the building was secure enough that the doorway into the old workshop could be knocked through, and the picture below shows this being done.
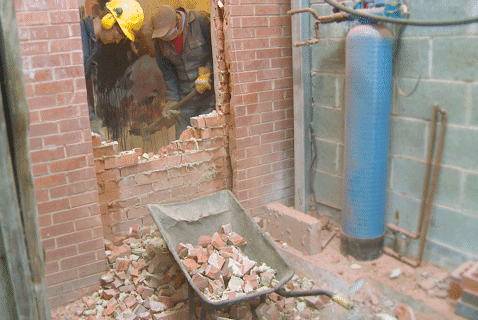
Knocking through the doorway into the old workshop. One skin of bricks has already been taken out, and the second is being removed.
Picture © Gavin Johnson, 2017.
Once all of the bricks had been removed then the frame for the new door could be fitted, as shown in the picture below.
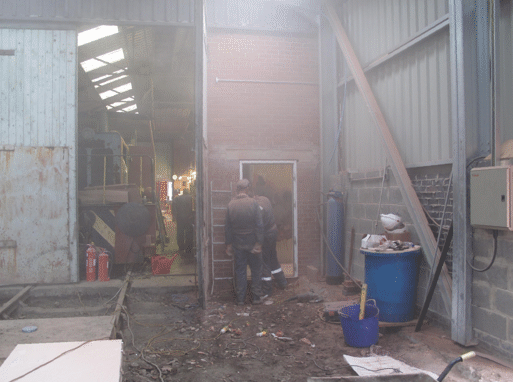
View into the old workshop, showing the frame for the new doorway. Some of the plumbing for the water treatment plant had now been done.
Picture © Tony Cowling, 2017.
Fitting the door into this new frame was then a comparatively simple job, and the picture below shows it in place.
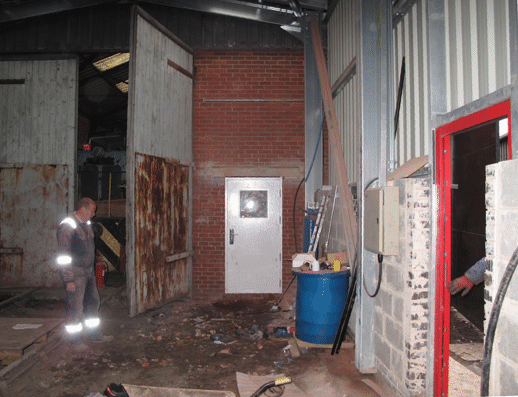
View into the old workshop, showing the new door in place. The old doors across the track will be replaced by a roller shutter door.
Picture © Tony Cowling, 2017.
By this point the building was secure enough that we could start to stable locomotives in it, and we could use the pit for washing out boilers. At this stage the building was not yet ready for preparing locomotives for traffic, but other work could be done on them, as shown in the picture below.
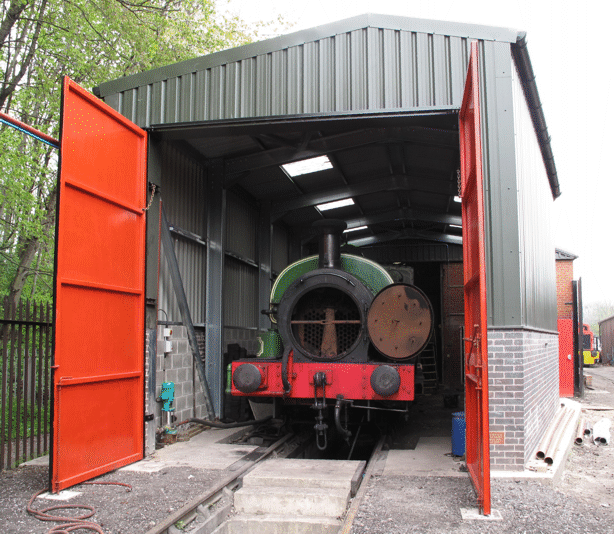
Slough Estates No. 3 in the shed in early April, with its smokebox door open ready for some work to be done on it.
Picture © Tony Cowling, 2017.
To be able to prepare locomotives for traffic the building would need to have smoke troughs fitted inside the roof, and the construction of these had started, as shown in the two pictures below. As can be seen they are constructed round a timber former, using plywood sections joined together with strips of stainless steel. The plywood is then given a heavy coat of black bitumastic on the inside, and this will enable it to stand the corrosive effects of the smoke better than metal would.
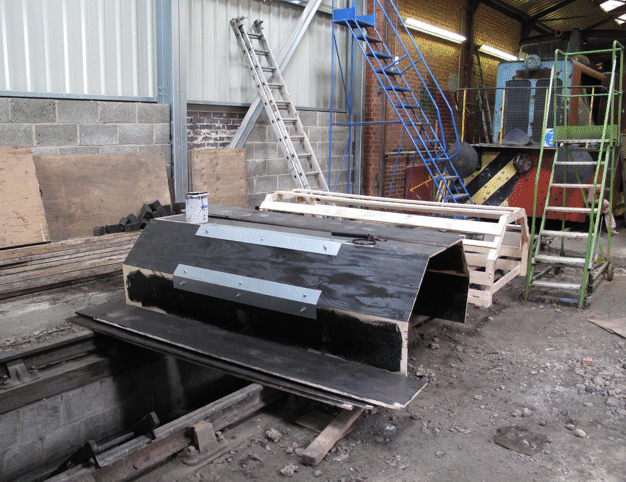
A section of smoke trough being constructed, with the former for shaping the trough behind it. Note that the wooden doors across the track between the running shed and the old workshop had been removed.
Picture © Tony Cowling, 2017.
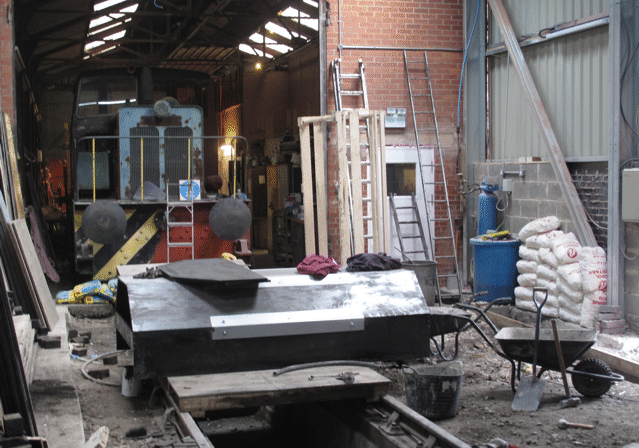
A section of smoke trough being constructed, with the former standing on its end behind it, and a view behind that into the old workshop.
Picture © Tony Cowling, 2017.
Also, inside the building work had started on laying the wooden blocks for the floor, as enough of them had now been cleaned to enable a worthwhile area to be laid.
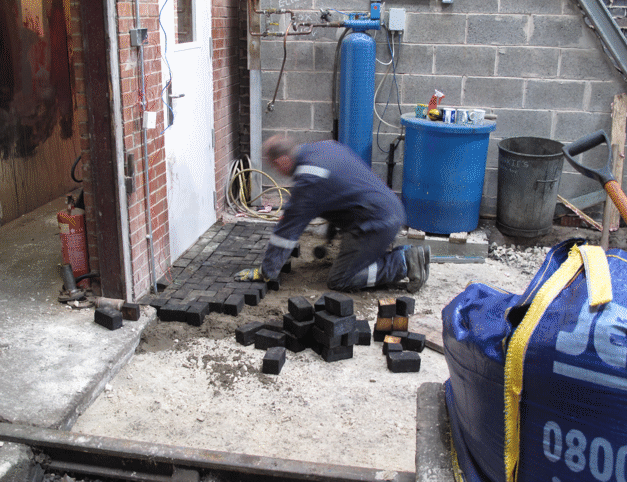
A volunteer laying the first few flooring blocks, starting in the north-east corner of the shed.
Picture © Tony Cowling, 2017.
Once the first few blocks had been laid, it became apparent that the concrete needed shaping off to allow the blocks to fit closely against it, and the picture below shows this being done.
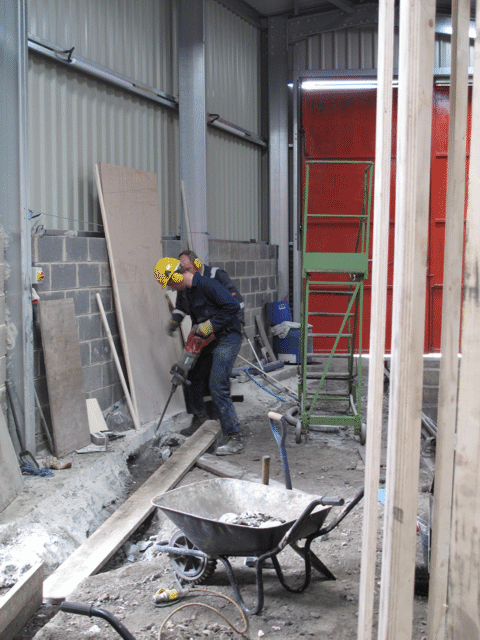
Volunteers working with Kango hammers to shape off the edge of the concrete to allow the blocks to be fitted closely to it. The timber visible in the right of the picture is the former for sections of the smoke trough, standing up on its end.
Picture © Tony Cowling, 2017.
By early July the east side of the blockwork floor was almost complete, as shown in the picture below.
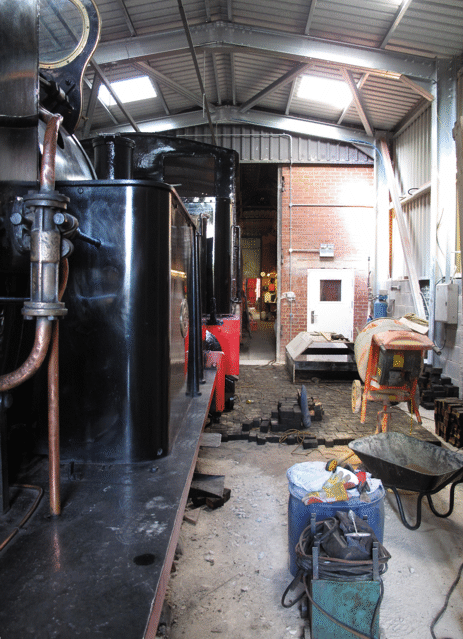
Looking down the length of the shed (containing Sir Berkeley and the Sentinel), and beyond into the workshops.
Picture © Tony Cowling, 2017.
By about the same time, the first complete section of the smoke trough (ie twice the length of the former) was ready to be fitted up into the roof of the shed, and this is shown in the picture below.
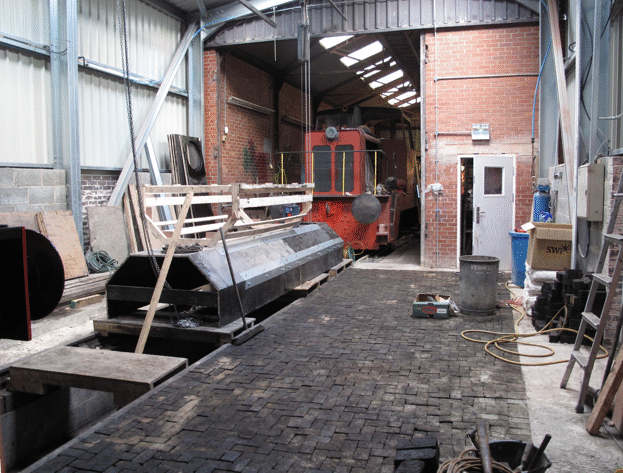
One half of the smoke trough, ready to be lifted up and fitted into the roof, with the former upside-down on top of it.
Picture © Tony Cowling, 2017.
Fitting the sections of smoke trough up into the roof was done by a couple of our volunteers who have qualifications in rope access work, but they definitely didn't want an audience when they did it, and so we have no pictures of it being fitted, which was done by the end of July. The picture below, which was take in early September, shows this first half in place, and the second half almost complete. It also shows that the blockwork for the west side of the floor was making good progress.
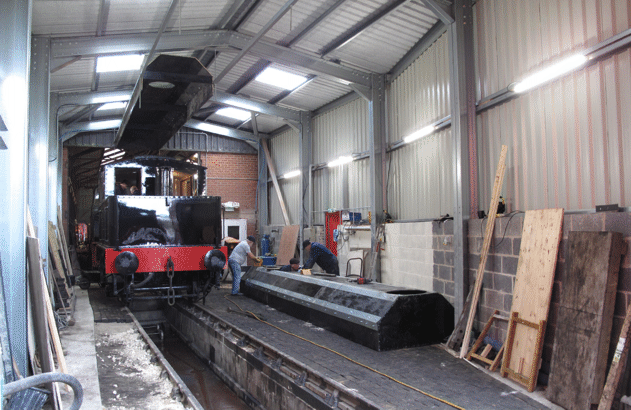
The Sentinel in the shed, underneath the half of the smoke trough that is in place, and with the other half being finished off alongside it.
Picture © Tony Cowling, 2017.
By early November the whole of the smoke trough had been completed, as had all the blockwork for the floor, and we were close to being able to use the shed for its intended purpose.
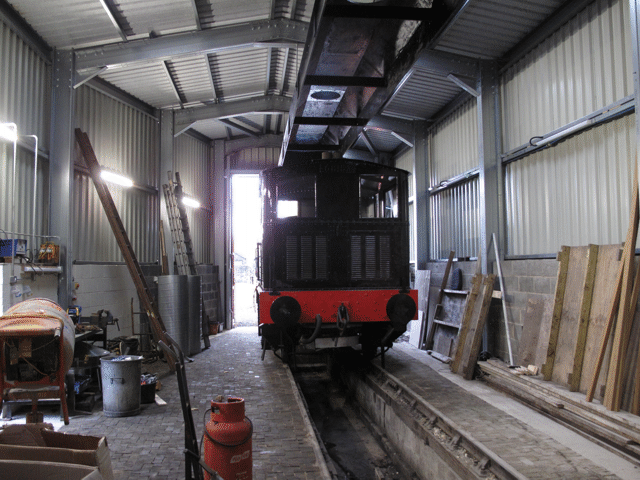
A view southwards down the running shed, showing the Sentinel, with above it the completed smoke trough and alongside it the completed blockwork floor.
Picture © Tony Cowling, 2017.
Indeed, in December the shed was used for the first time for preparing the locomotives for the Santa special trains, and the picture below shows the shed empty, because the locomotives are out on the train. Even though the weather was relatively kind, this had been a huge improvement on having to prepare them out of doors.
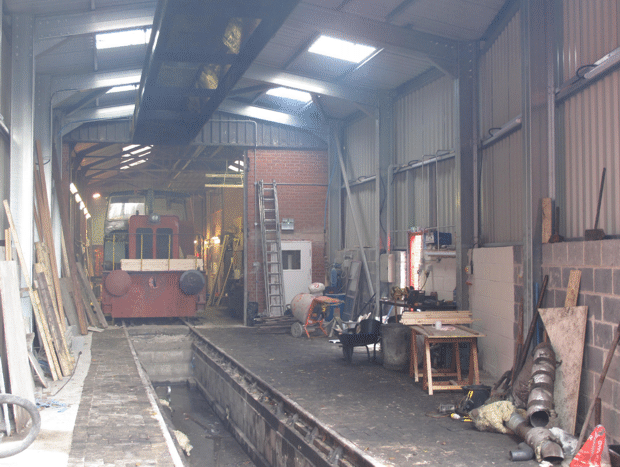
The running shed on the first day when it had been used for preparing locomotives for operation, looking towards the old workshop.
Picture © Tony Cowling, 2017.
Meanwhile, there was still a little more work to do outside, because there had been some errors in engraving the bricks, and this had required a few bricks to be re-engraved, and then fitted in place of the faulty one. The picture below shows a volunteer laying the few replacement bricks.
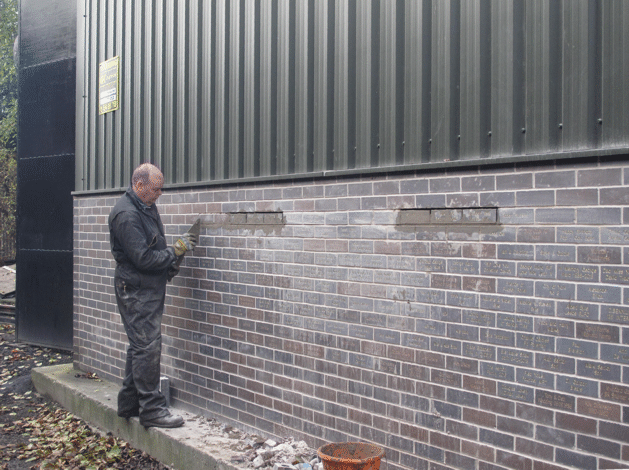
A volunteer laying the bricks that had needed to be re-engraved because of errors in the original engraving.
Picture © Tony Cowling, 2017.
This was not quite the end of the fitting out work, as there were still various odd jobs outstanding, like fitting the roller shutter door between the running shed and the old workshop, but for most practical purposes the project to build a running shed was complete.
Also, somewhere well before this point had been reached, it had been suggested that we should think about organising a formal opening ceremony for the shed, and it had been agreed to do this in order to round off the project.
Go on to the next stage in this project.
Go back to the previous stage in this project.
Return to the overall description of this project.
More Information
Other pages about this project and the "Buy a Brick" appeal:
- An overview of the project and the appeal;
- The "Buy a Brick" appeal;
- The structure of the project;
- The progress with the project;
- The construction of the pit;
- Design and site preparation;
- Construction of the foundations;
- Erection of the framework;
- Construction of the walls and roof;
- The opening ceremony.
Other pages provide more information about:
The "Picton Shelter" (Preparation)
 The major part of the project to conserve Picton, which is financed by a grant from the Heritage Lottery Fund, is the construction of a building to shelter the locomotive from the elements, after it has been treated to prevent further corrosion of the metal. This building is therefore known as the Picton Shelter, although actually it will have two parts, since as well as sheltering and displaying Picton it will also house at least one other locomotive, so as to guarantee that there will always be covered accommodation available for Brookes No. 1 if it needs it.
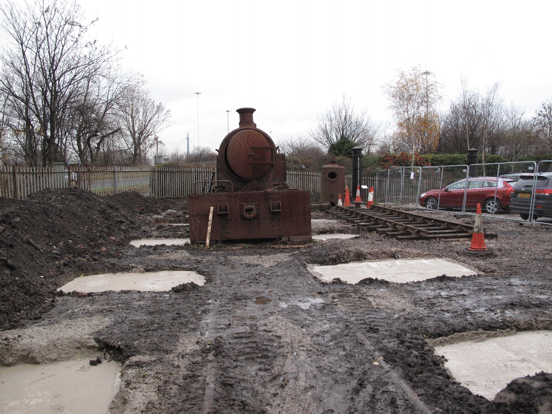
The Picton shelter is being constructed in the north-west corner of the Moor Road site, adjacent to the railway's car park. This is where Picton stood when it first arrived at the railway, as illustrated below.
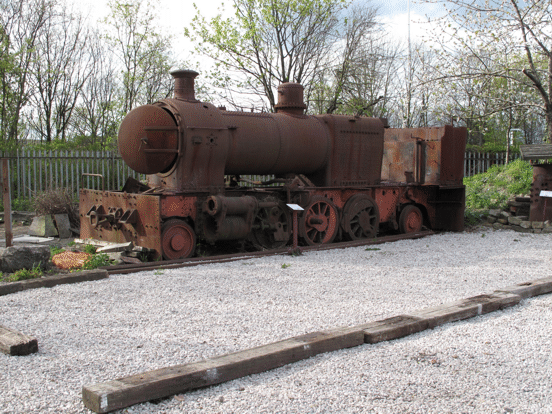
The track on which Picton is standing in the picture above is where the part of the shelter will be built that will house another locomotive under cover. The area in front of Picton is where a new siding would be constructed, and then Picton would be craned onto this siding and will be displayed there. For this purpose the part of the whole building that will house Picton will have a roof and ends, and a wall between it and the other part of the building, but the side facing towards the camera will be open.
The timber edgings that can be seen in the picture above marked the boundary between the site of the shelter and the car park, and were there to stop cars from parking on the area where the new siding was to be constructed. This is because our volunteers had put a lot of effort into site preparation, and in particular preparing the ground for laying the track for the new siding. In the right hand side of the picture can be seen an old firebox for a Sentinel locomotive, and before the shelter was built this would be relocated eastwards, along with a couple of other items that were at that time exhibited in this corner of the site.
Some aspects of the project to construct the shelter are linked in with the project to construct a Running Shed, particularly since the application for planning permission had to cover both projects, and so the delays with obtaining that affected both projects. On the other hand the Picton Shelter is a much simpler building, since it does not require a pit or an oil separator, but apart from this the basic programmes for both projects are very similar. Thus, most of the description of the Running Shed project applies to the Picton Shelter as well, and there is no need to repeat it all here.
Because of this, the advice that we were given was that it would be advantageous to also link the two projects when putting the design and construction work out to tender, and so the tendering process for the Picton Shelter had to wait while our volunteers built the pit for the Running Shed. Eventually the two projects were put out to tender together, as is described in the page that records the progress of the Running Shed project, and indeed the same contractor was selected for both, namely Midbrook Steel.
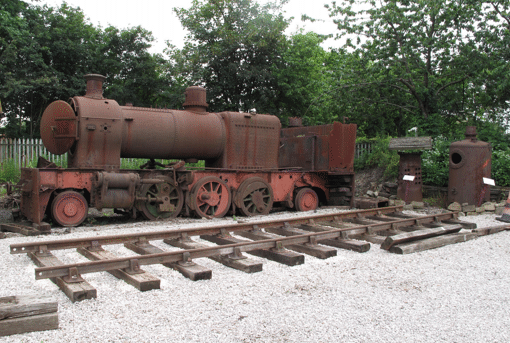
Having selected a contractor, our volunteers needed to speed up the rest of the preparatory work, and in particular needed to actually lay the new siding where Picton would stand. This new siding is illustrated in the picture above. Another bit of preparatory work was to check that Picton could actually be lifted safely off the track where it stood when the time comes to crane it across. So, some jacking was done to test this, but when it came to lowering Picton back down again its rear end moved sideways by a couple of inches, which is why the the picture above shows that the rear wheels were no longer on the rails. They would be once it was finally in place!
Meanwhile, we had been investigating the process of preparing Picton for spraying with preservative. The advice we were given is that this will require a mixture of shotblasting and other rust removal processes, and that it will be best to leave this work until Picton is inside its shelter, so as to contain the debris that this process will inevitably produce.
The links with the running shed project meant that it suited Midbrook Steel to defer construction of the shelter until they would be coming on site to install the wall cladding for the running shed. In the event this was delayed until the beginning of December, when their groundwork team arrived on Monday 5th to excavate for the foundations of the shelter, as shown in the picture below. The yellow lines on the ground are nothing to do with the shelter construction, but indicate where car parking spaces had been!

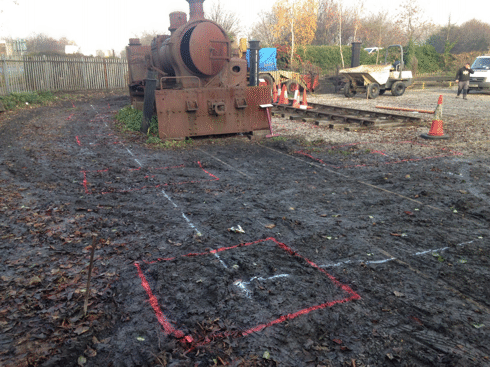
The first step in doing this was to mark out the site, and this was completed by the end of that Monday, as shown in the picture below, taken shortly before the safety fencing was put up round the site. The white lines indicate where the walls of the shelter will be, and the red lines mark the edges of the holes for the foundation blocks that will support the uprights for the frame of the shelter.
By the following Saturday the site had been fenced off, the excavations had been done and the concrete had all been poured, so that the foundation blocks were complete, although they had not yet had the brackets for the frame uprights fitted. The results are shown in the four pictures below, where Picton is still on the alignment of the back road siding, as it had not yet been craned onto the new siding.
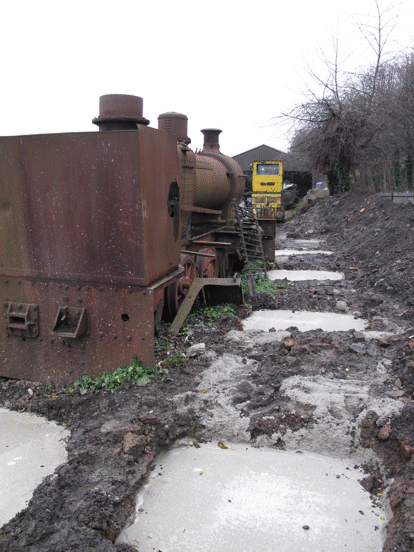
The picture above is taken from the north end of the site, looking towards the workshops, and shows the foundations for the west wall of the shelter building.
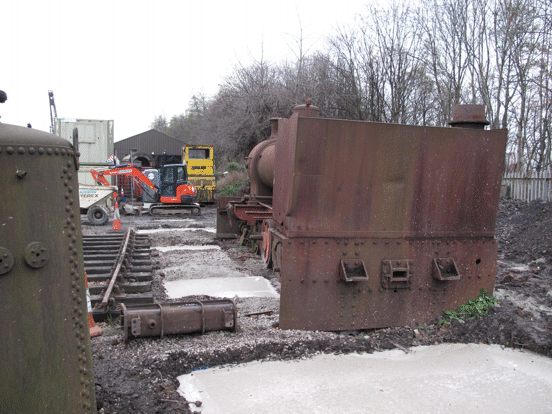
This is also taken from the north end of the site, looking towards the workshops, and shows the foundations for the centre wall of the shelter, which will separate the enclosed part of the building from the shelter itself.
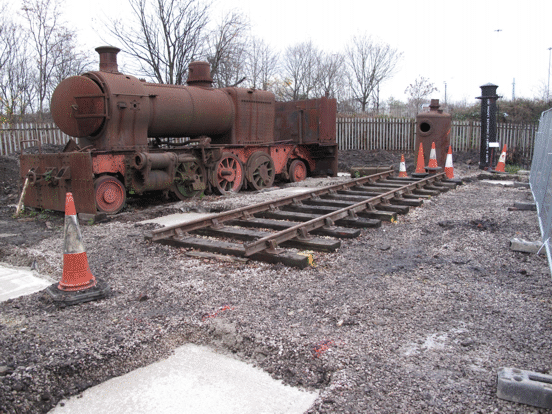
The picture above is taken from the other end of the site, looking northwards: the foundation block in the foreground is for the south-east corner of the shelter, and the equivalent for the north-east corner can be seen in front of the right-most traffic cone (which is not part of the construction work!). The objects beyond the Picton siding are the boiler from the Booth 2-ton crane, which will eventually be refitted to the crane, and one of the Saxby and Farmer gateposts.
This is also looking northwards, showing the foundations for the west and centre walls of the building.
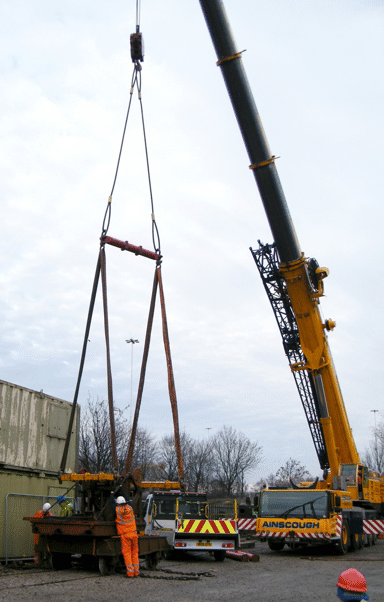
Following this we had to wait for the crane to be available, and it came in on the Monday of the week before Christmas (19th December). As well as lifting Picton it was also being used to lift the two old steam cranes into place, and the picture below shows it starting to lift the Booth crane.
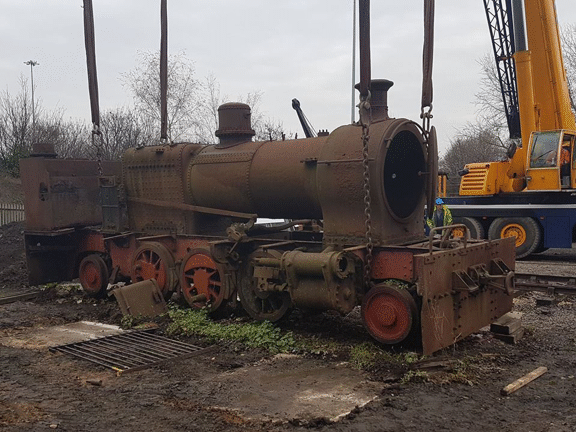
Once both of these cranes had been positioned then it was Picton's turn. The picture below shows it with all the slings in place for the lift, and Picton just an inch or two off the ground to check that the lift would be safe.
With everything safe, Picton was then lifted, as shown below.
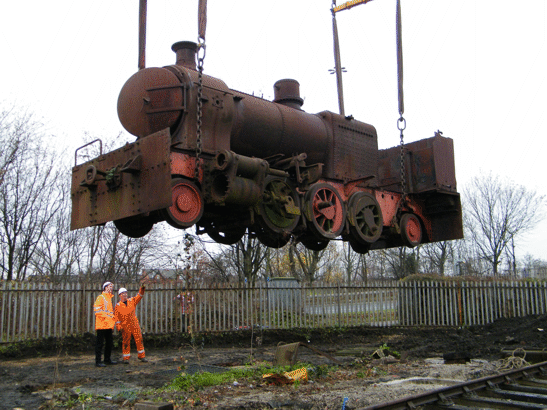
The crane then just needed to jib in, and Picton could be lowered onto its siding, as in the picture below.
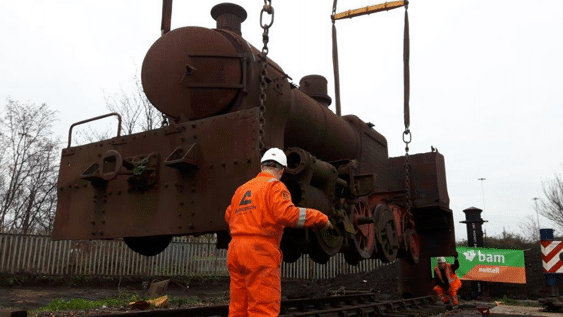
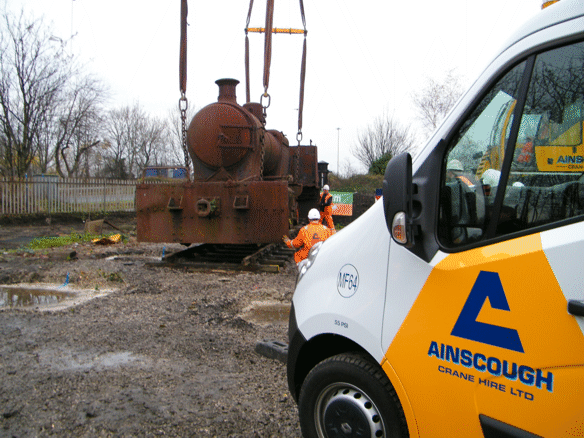
When lowering any item of rolling stock onto the track the last couple of inches are the most difficult bit, and in the picture below Picton is almost there, and is being carefully lined up with the rails before that crucial last couple of inches.
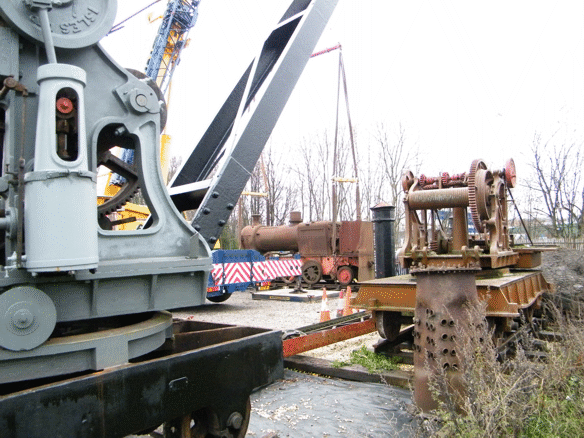
Finally the picture below, taken from the display area for the old steam cranes, shows Picton safely in place on its siding.
And here is a credit for the contractors who made such a good job of the lifting operations.
With Picton now on its siding the construction work could continue, and a separate page describes the progress of this.
Go on to the next stage in this project.
Return to the overall description of this project.
More Information
Other pages about this project:
- Conserving Picton.
- The construction of the "Picton Shelter".
Other pages provide more information about:
The "Picton Shelter" (Construction)
 The major part of the project to conserve Picton, which is financed by a grant from the Heritage Lottery Fund, is the construction of a building, known as the Picton Shelter, which will both shelter and display Picton and house at least one other locomotive.
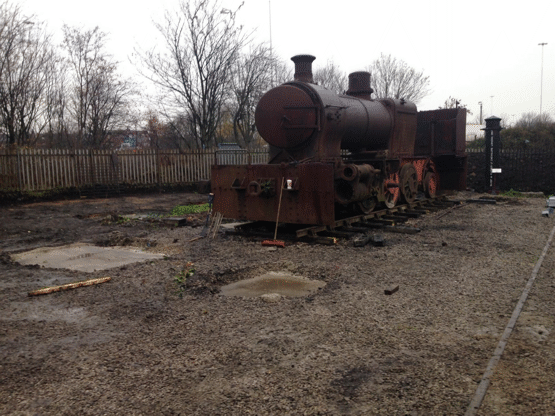
A previous page described the preparations for constructing this shelter, including the laying of a special siding for Picton to stand on, the construction of the foundations for the shelter, and finishing with the lifting of Picton to move it onto this siding. The picture below shows it in place on this siding, ready for construction work to begin.
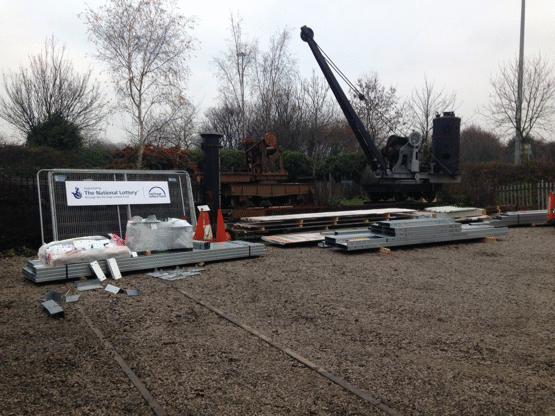
On the next day after the lift (the Tuesday before Christmas, 20th December) all the parts for the frame of the building were delivered, and spread out on the car park, as shown in the picture below.
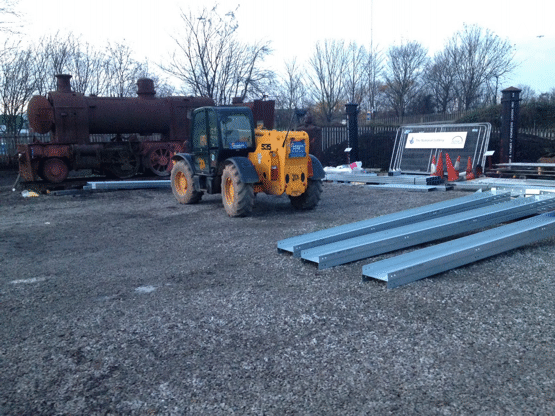
As the various parts were sorted out they were moved into place, as shown in the picture below, ready to be fastened to the brackets that were being attached to the foundation blocks.
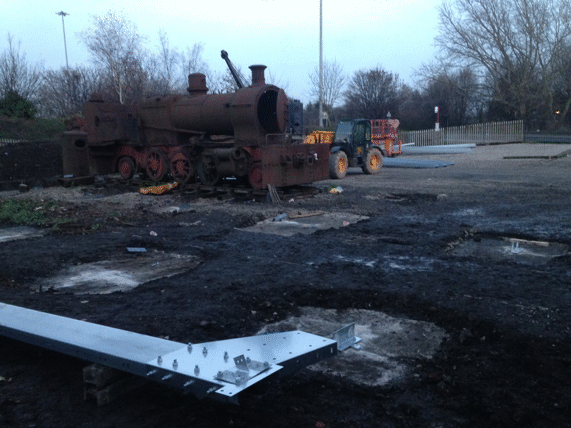
By the end of Tuesday, most of these brackets had been fixed into place, as shown in the picture below, and the frame sections were ready to be lifted into place and attached to them.
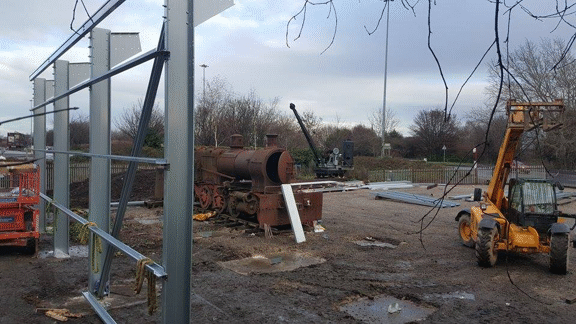
During Wednesday (21st December) the uprights for the frame were lifted into place, and the sheeting rails that connect them fitted. The picture below shows where this had got to by the middle of the day, with four out of the five uprights for the west wall of the building in place.
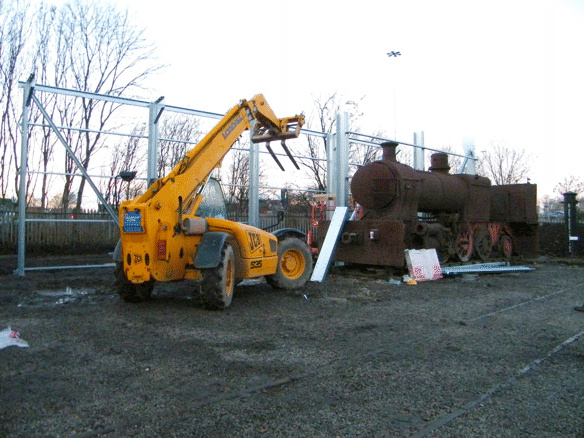
By the end of Wednesday the frame for the west wall was complete, and three of the uprights for the centre wall were in place, as shown in the picture below.
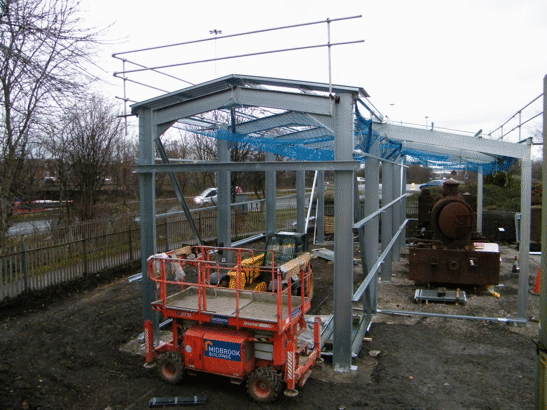
By the end of Thursday the frame had been completed, as in the picture below, which also shows some of the machinery used to erect it.
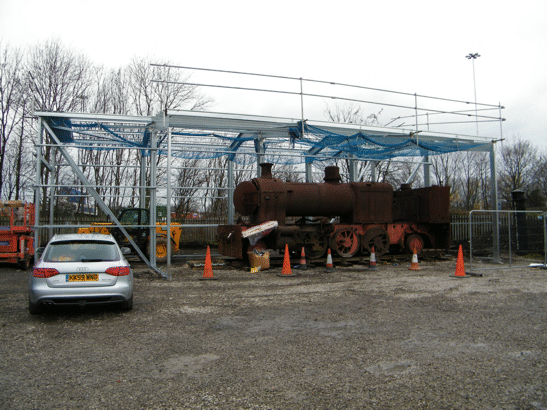
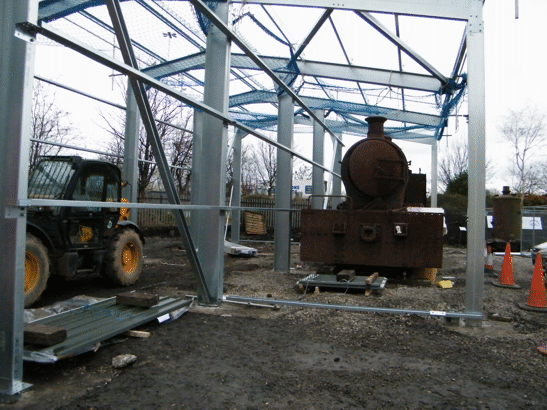
The picture below is taken from the car park, and shows Picton in the shelter. The railings round the roof girders, and the netting between them, are for the safety of the workers when they come to fit the roof cladding sheets.
The picture below shows a front view of Picton in the shelter.
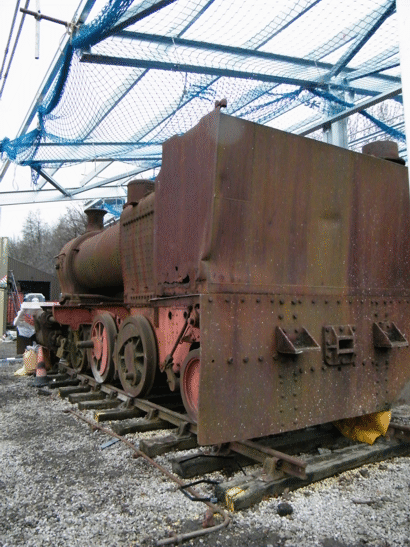
And the picture below is the equivalent view from the rear of Picton.
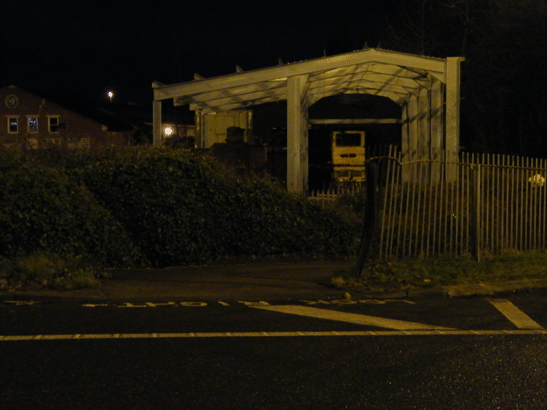
The whole Picton shelter building will be clearly visible from the motorway roundabout, as shown in the picture below. The yellow object that can be seen through the shelter is the Greenbat electric locomotive, but this will not be visible once the cladding of the shelter has been fitted.
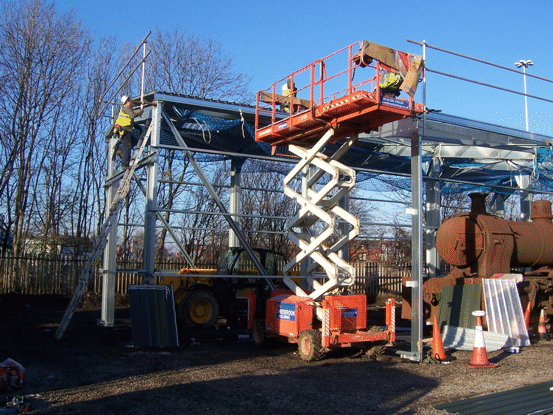
After Christmas work resumed on fitting the cladding to the frame, and the picture below shows the roof cladding being installed.
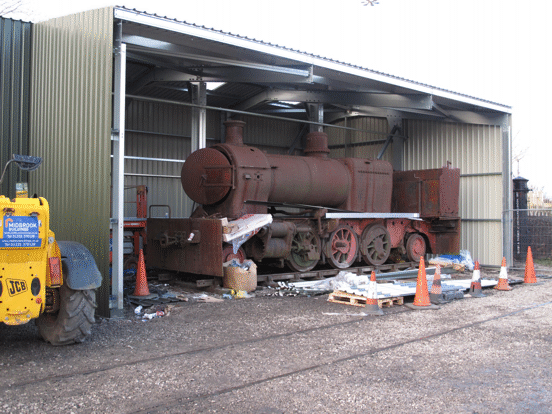
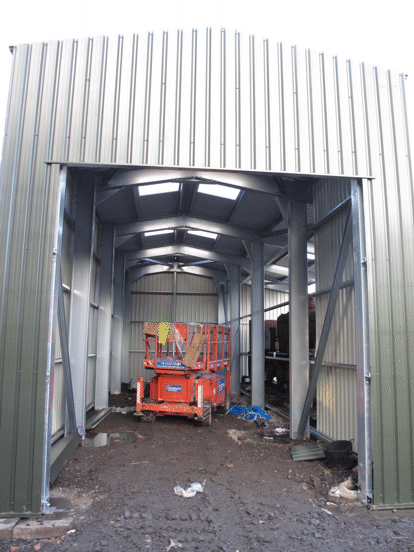
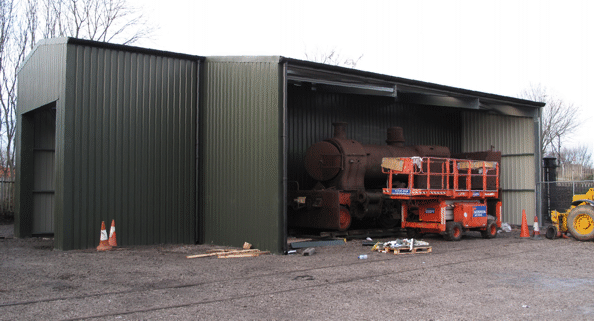
By the end of December most of the cladding had been fitted, as shown in the pictures below. The main bit that was still to be installed was the wall that separates Picton from the shed part of the shelter.
The picture below shows the view in from the south end of the shed part of the shelter, with the scissor lift parked inside it. The absence of the cladding that will separate this part of the shelter from Picton itself is very noticeable.
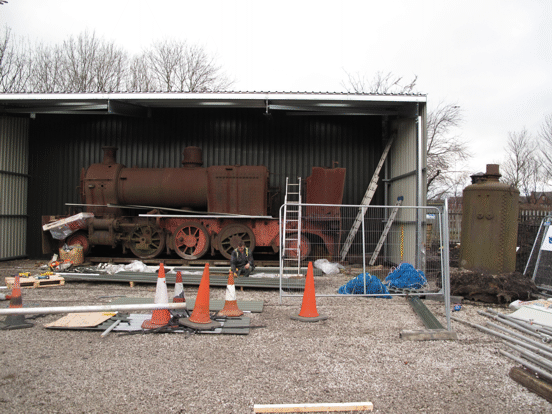
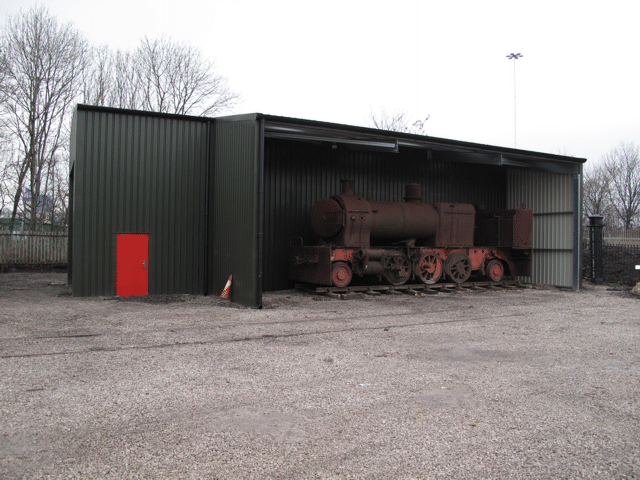
In the first week of January the rest of the cladding was fitted, and the picture below shows Picton with the wall cladding behind it.
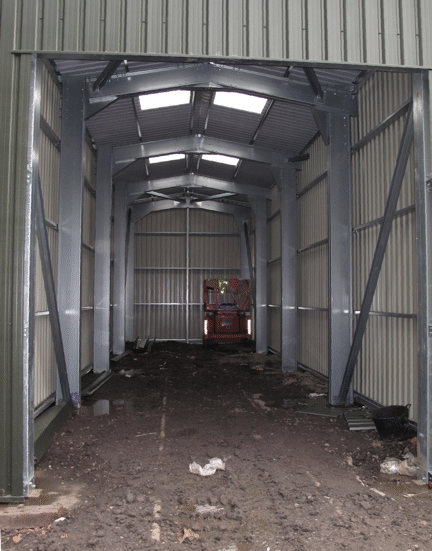
And here is the view in from the south doorway.
By the end of that first week in January all the guttering, flashing and other details had been fitted, as shown in the picture below, and just the doors still needed to be installed. At this point the cladding still covered where the personnel doors would go.
The doors were fitted the following week, and the picture below clearly shows one of the two personnel doors in the completed shelter: the other is at the north end of the building.
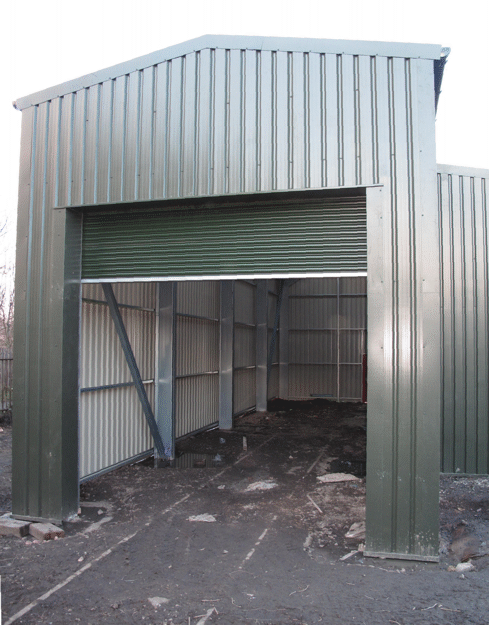
As well as the personnel doors, the roller shutter door for the south end had also been installed, and the picture below shows this partly closed. Opening and closing it will be easier once a power supply to the building has been installed!
With any construction project, when it reaches this stage there are likely to be some snags to be sorted out, and this building is no exception. The main snag is that some of the ground round the building is still slightly higher than the tops of the foundation blocks, and so water is tending to collect round these blocks. A bit of careful digging will therefore have to be done to lower the ground levels. The other snag is that the unmade ground does not really provide a satisfactory floor inside this part of the building, and so some of this will be removed and replaced by ballast.
Also, when the contractors removed their site fencing panels they took with them the Heritage Lottery Fund board which had been attached to one of the panels. We still have a second board, and this needs to be fitted permanently inside the shelter, so as to acknowledge their funding of its construction.
Watch this space for further progress!
Go back to the previous stage in this project.
Return to the overall description of this project.
More Information
Other pages about this project:
- Conserving Picton.
- Preparation for constructing the "Picton Shelter";
Other pages provide more information about:
Running Shed Phase 4 (Construct Foundations)
As described in the page for the structure of the whole project, the Running Shed is being built in seven phases. The first three phases were all concerned with preparation for the actual construction work, and after various delays this work finally commenced on 31st May 2016 - at 6.00am, no less!
The first step was to bring the necessary plant onto site, and the picture below shows Midbrook Steel's dumper track running up through what is normally our security compound, closely followed by their excavator. The dumper truck is carrying a load of metal fencing panels that were used to make the construction site secure.

Construction plant arriving on site.
Picture © Mark Calvert, 2016. Taken at 6.10 in the morning on the first day of construction work!
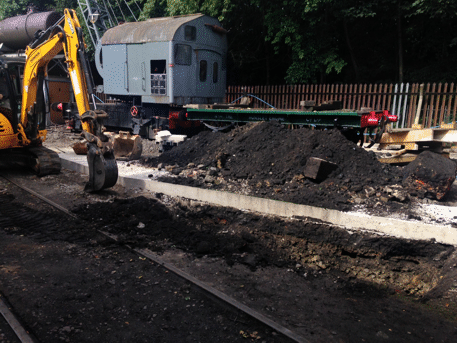
Once established on site the contractors wasted no time, but of course for constructing foundations you have to start by digging down before you can build up. So, the first step was for the excavator to start digging the trenches for the foundations on the east side of the running shed, and by mid morning good progress was being made, as shown in the picture below.
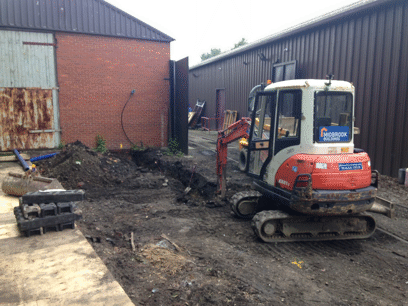
Midbrook Steel's excavator digging out the foundation trench for the east wall of the running shed. Note the covered pit on the left-hand side of the picture.
Picture © Mark Calvert, 2016.
By the end of Tuesday the trench was complete, but it needed to be checked by the building inspector. He came on Wednesday, and gave permission for the concrete to be poured, so later that day three lorry loads of it were delivered. Then a fourth lorry load was needed on Thursday morning (2nd June), to finish off the foundations for this side of the shed, and the picture below shows this fourth load being poured.
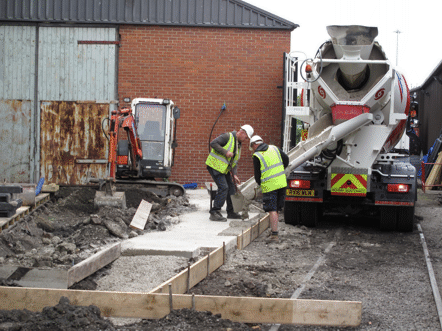
Concrete being poured for the east side foundations.
Picture © Tony Cowling, 2016.
Once this load of concrete had been poured, and then the top smoothed off, attention switched to the west side. The picture below shows the trench for this side being dug, on the Thursday afternoon.
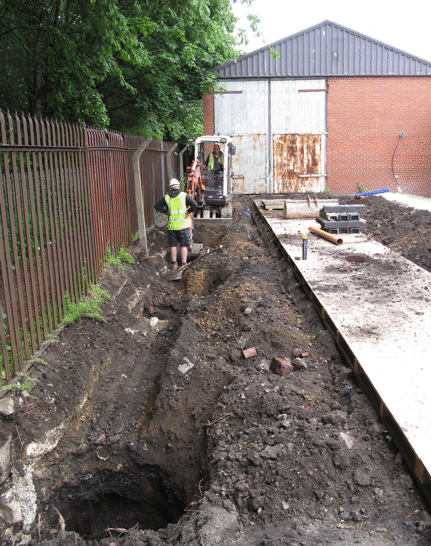
Excavating the foundation trench for the west side of the running shed.
The first two of the deep parts of the trench are clearly visible, and the excavator is working on the third. These deep parts are for the portions of the concrete that will support the uprights of steel frame.
Picture © Tony Cowling, 2016.
By Tuesday of the following week this trench had been completed, the building inspector had checked it and given permission to proceed, and the concrete had been poured. The picture below shows it with the shuttering still in place, but once the concrete had set to the point where the shuttering could be removed then the foundations were complete.

The foundations for the west side of the running shed, after the concrete had been poured but with the shuttering still in place. The blue pipe that feeds the water tower can be seen suspended from the fence posts, to ensure that it did not get buried in the foundations.
Picture © Mark Calvert, 2016.
As soon as the work on the foundations had reached a stage where the pit could be used, then it was, as shown in the picture below. This was taken during the model railway exhibition, where "Driver for a Fiver" was being operated, which is why there is a yellow flag and a red flag visible between the rails of the track on the right of the picture, to mark the limits of the operation.
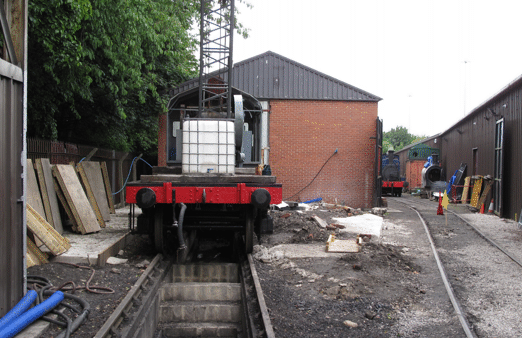
The crane and the ex-Hunslet flat wagon (with a large water carrier on top of it) standing inside the area of the running shed, with the completed foundations visible on both sides.
Picture © Tony Cowling, 2016.
The next step was to install the oil separator, which was done between 13th and 15th July 2016, fitting round the preparations for our Victorian Gala on 16th and 17th July. The oil separator is a large unit, as shown in the picture below, where it is on the ground in the security compound, waiting for the hole to be dug for it.
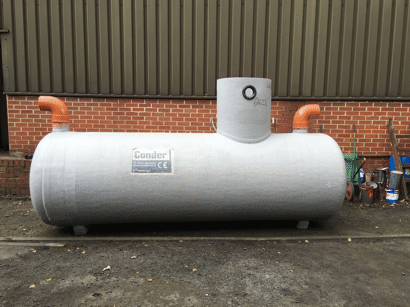
The oil separator, waiting to be installed.
Picture © Janet Auckland, 2016.
Meanwhile, Drainstore (who had supplied the separator) were excavating the hole for it, as shown in the picture below. Eventually the hole would be nearly 3 metres (9 feet) deep.
Excavating the hole for the oil separator, between the foundations of the running shed and the track into the security compound.
Picture © Mark Calvert, 2016.
Once the hole had been excavated, then dry concrete needed to be laid into the bottom of it, for the separator to sit on, and the picture below shows the dry concrete being delivered. Once the bottom layer had been laid, then the separator could be lowered into the hole, as shown in the picture below that, and more dry concrete tipped round it to hold it in place.
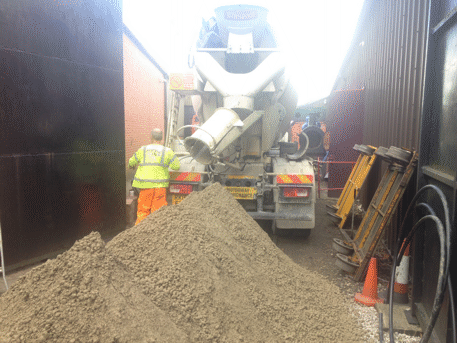
The dry concrete being delivered.
Picture © Mark Calvert, 2016.
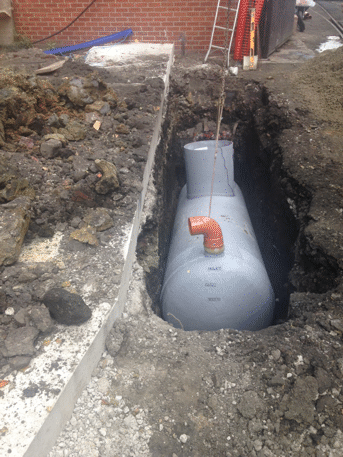
Lowering the oil separator into the hole.
Picture © Mark Calvert, 2016.
Once the oil separator was securely in place, then the inlet pipe from the pit and the outlet pipe to the drain could be connected up, and the chambers for the pump and outlet constructed on top of it. The manhole covers for these were then fitted, and in the picture below they are all that can be seen of the separator.
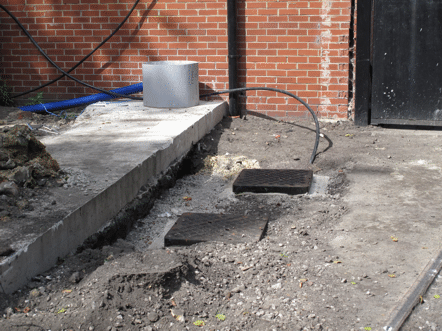
The oil separator installed, with just the manholes visible.
Picture © Tony Cowling, 2016.
This completed the construction of the foundations, and once the spoil had been cleared everything was ready for erection of the framework to start.
Go on to the next stage in this project.
Go back to the previous stage in this project.
Return to the overall description of this project.
More Information
Other pages about this project and the "Buy a Brick" appeal:
- An overview of the project and the appeal;
- The "Buy a Brick" appeal;
- The structure of the project;
- The progress with the project;
- The construction of the pit;
- Design and site preparation;
- Erection of the framework;
- Construction of the walls;
- Fitting out;
- The opening ceremony.
Other pages provide more information about:
Conserving "Picton"
 As part of a successful Heritage Lottery Fund bid, the Middleton Railway has embarked on a project to conserve Picton (Hunslet 1540 of 1927), illustrated below. This locomotive forms an important part of the Leeds locomotive building story and our history, having been built less than a mile from the railway. It was part of a range of standard locomotives that was developed by Hunslet’s specifically for export, which differed from the range of 0-6-0 saddle tanks that they built of industrial use in the UK (such as Brookes No. 1, whose overhaul is also funded by the same lottery bid) by having outside cylinders and side tanks. They also had a variety of wheel arrangements (Picton is a 2-6-2), and were built for a variety of gauges (although Picton is for standard gauge track, but it is significantly wider than a standard gauge locomotive for UK use would be).
As such, Picton is a rare example, because there are very few representatives of this range of locomotives left in this country, precisely because nearly all of them were exported. It was one of a batch of three built for export to a sugar mill in Trinidad, where it spent the whole of its working life. It was discovered there by David Monckton, a former chairman of the Middleton Railway Trust, along with the other two from the same batch. He recognised its importance as a representative of this range of exported locomotives, and he was eventually able to select it as the best of the three survivors, re-import it back into the UK, and bring it to the Middleton Railway.
The picture below shows Picton when it first arrived at the Middleton Railway, with its wheels still attached to the lengths of rail on which it had been mounted for transport (it came from Trinidad as deck cargo on a banana boat). Still clearly visible on the wheels are the remains of the Brunswick Green paint that was the standard Hunslet colour scheme for locomotives where the new owners did not specify that their own livery was to be used.
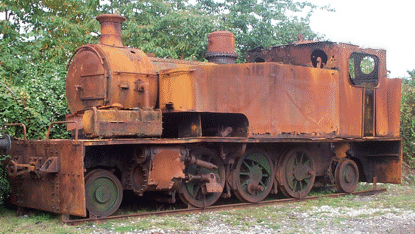
When Picton first arrived at the Middleton Railway there were some suggestions that it should be restored to working order, but these did not last long once it was realised that the locomotive's bufferbeams are so wide that they would demolish the railway's platforms. Also, once the locomotive was inspected carefully it quickly became apparent that so much of it would have to be replaced that this would be more a matter of building a replica than restoring the original. Indeed, this inspection revealed that the tanks and cab were so badly corroded that they were actually dangerous, and they had to be taken off the locomotive.
Thus, when the Middleton Railway set up its project to acquire Brookes No. 1 and Picton from David Monckton and then conserve them, the most that could realistically be done for Picton was firstly to coat it with preservative (having prepared the surface of the metal by shotblasting it), and then to construct a building to protect it from the elements. The construction of this "Picton Shelter" building is thus a major part of this conservation work, and separate pages give more detail of the construction of this shelter.
Go on to the next stage in this project.
More Information
Pages about other projects:
- Last Coals to Leeds;
- Raising Steam in No. 6;
- Project Phoenix;
- Building a Running Shed;
- Overhauling "Brookes No. 1".
Other pages provide more information about:
- Our portfolio of development projects;
- Our museum collection;
- How you could get involved;
- What we offer for visitors;
- Our train services;
- How to find us.
Subcategories
Projects
Projects and appeals.
Volunteering
For pages related to volunteering and membership

